New Number Settings in GUPSHUP
Prerequisites
- Phone number to be activated.
- Display Name: the name with which the customer will be identified in the broker.
- Facebook Business Manager ID, the 15-digit number that uniquely identifies the client.
- Company name (as it appears on FBM), the name that appears on FBM.
- Company's Facebook page, for example, https://www.facebook.com/example.
- Customer's physical address.
- Have the phone number active to receive calls or SMS on a mobile device.
-
Have the phone number on a mobile device that does not have the WhatsApp application installed. If the application is installed, please consult HERE how to delete it properly
-
In case of number migration from another provider, the 2FA of the other provider must have been deactivated
Activate new application for new number
a) Go to the Gupshup page.
b) Authenticate with the email created for this client.
c) Go to WhatsApp Dashboard.
d) Go to Create Your First App.
e) In Select the type of application you want to create, click on API Access, enter the name of the application and press Send.
Note ❕: The name should be indicative of the service and the client, the client may want to have other services and it should not be repeated. Symbols are not allowed.
f) Verify the acceptance policies of Automated Opt-in (Optional).
- Press Next and activate sending messages to your users.
- Then press go to Control Panel.
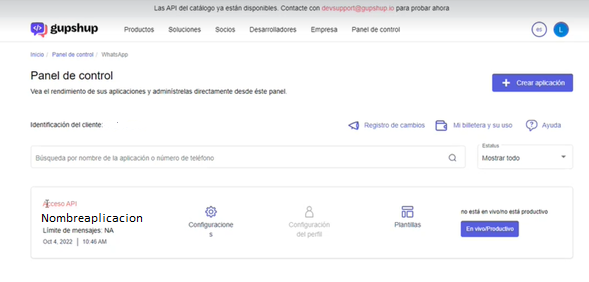
g) There, we will see that the application is already created but not yet productive. Initially, this application is in Sandbox mode.
Configure connectivity to the sandbox.
a) Click on the button labeled Live/Production.
b) In the following window, select one of the two options presented according to your case:
-
Check the option Create a new WABA to create a WhatsApp Business account from scratch, then press Proceed.
-
Check the option Migrate existing WABA to migrate from another BSP to Gupshup. Your current BSP will need to disable 2FA to complete the migration, then press Proceed.
c) Next, under How do you want to create your WhatsApp Business account?, select Managed Onboarding with Gupshup and click the "Proceed" button.
d) A pop-up window called Checklist will appear. It is important to read the content carefully and then click I'm ready.
e) Next, it initiates a 6-step process:
Step 1 Accept Prices
a. Enter the client's data requested in the form.
b. Country: Keep India as the selected country.
c. Select the destination country to know the rate: Select Chile from the list.
d. Press "Proceed".
Step 2 Enter Details: Here the complete form is filled with the customer's data and then select the 3 options "I have read and accept...", "I confirm that the application..." and "I meet the requirements...".
Step 3 Preview: Offers a preview of data. Press Confirm and then an OTP code will arrive at the configured email, enter the configured email, locate the code and enter it as requested. Once confirmed, press Continue.
Step 4 Configure WhatsApp Account: This process will request the data to create a WhatsApp Business account. Here, you will be asked for the verified Facebook Business Manager ID, have it ready. It will also request you to set the phone number to configure, press Save.
Important ❕: If there is any error in the URL or Facebook business ID at this point, the application must be deleted and a new one created. This can be done in the Control Panel/Settings by pressing the Delete Application button.
a. The option to Set the Phone Number for WhatsApp will appear in the same window, then press Save.
Important ❕: It is important that the phone where the configured number is located does not have the Whatsapp application installed, as an error may occur.
b. The option to Set the Display Name for WhatsApp will appear in the same window, then press Save.
Important ❕: The name must be descriptive of the service provided, not too long, and not represent acronyms, for example: Customer Service. An example that is not acceptable: LTT Associates.
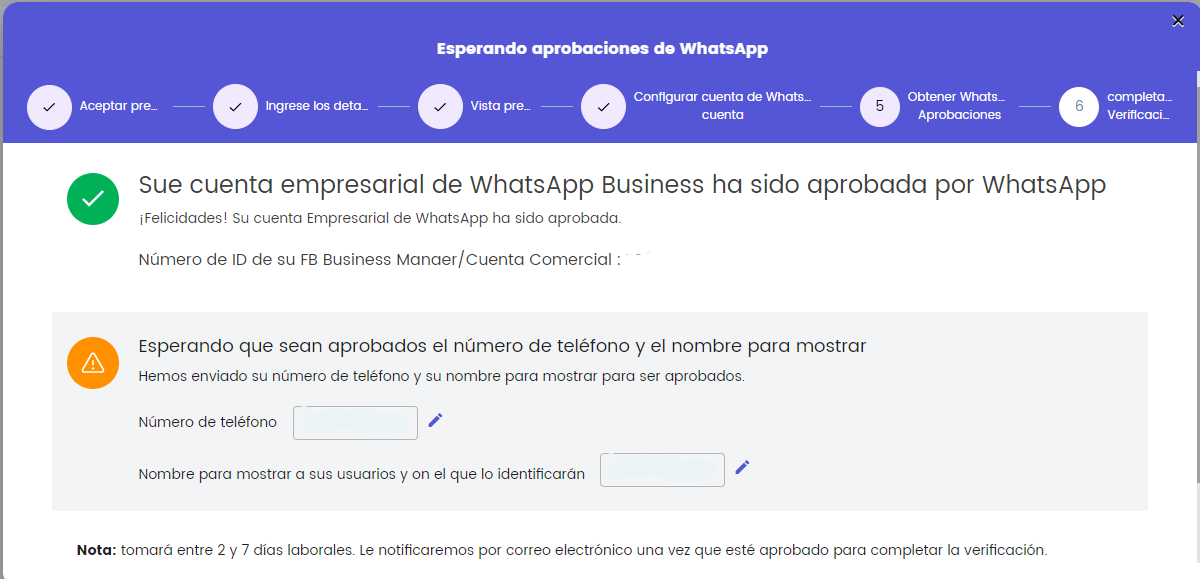
c. A notification will be sent to the Facebook Business Manager that the administrator must approve.
Step 5 Get WhatsApp Approvals is a broker process. Once your phone number and display name have been approved for WhatsApp, a notification will arrive indicating that your WhatsApp Business account has been approved. The approval status of the display name and phone number for the broker GUPSHUP will also be indicated.
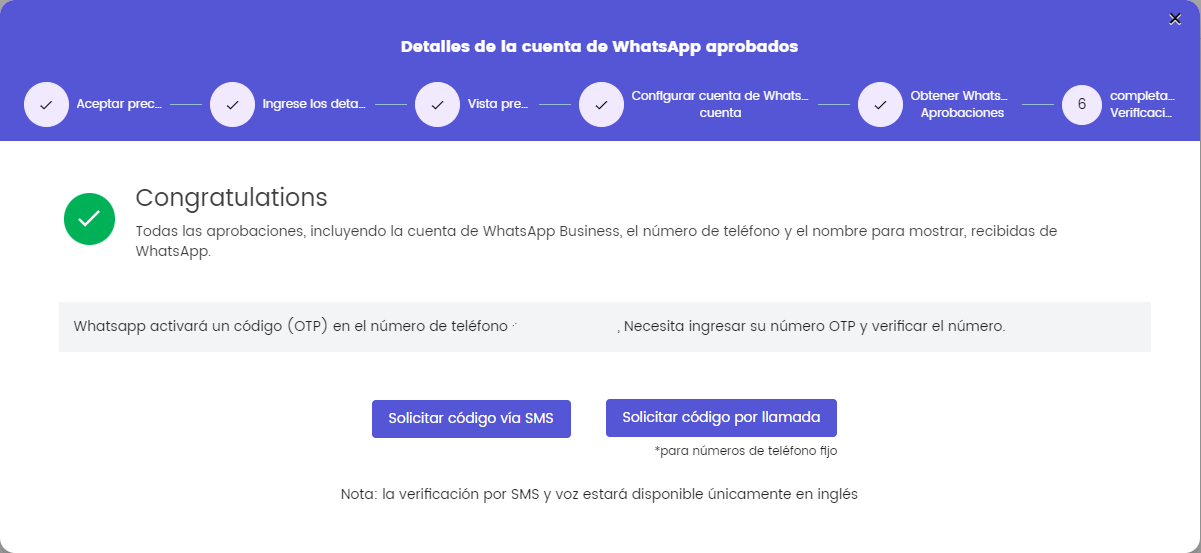
Step 6 Complete Verification in this step, the WhatsApp approvals have already been received by WhatsApp.
a. As the last part of the process, the activation of the OTP Code on the configured phone number is required. To do this, you will be asked to send a verification code via SMS or phone call. The configured phone number must be activated to receive SMS or calls.
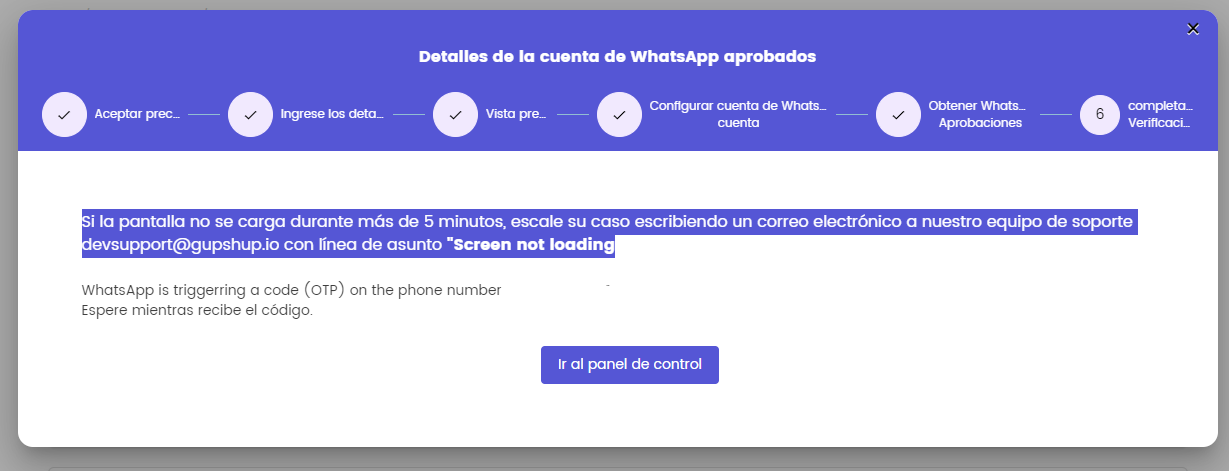
b. Once you have the SMS code, you will be asked to enter it to complete the verification and will be asked to wait a few minutes:
c. Go to the Control Panel/Settings and you will be able to see the configured application live for that number.

Configure Additional Number
- Go to the Gupshup page.
- Authenticate with the email created for this client.
- Create an application.
- Follow the steps in the process to Activate a new application for a new number.